Updating your Equipment Catalog
Whenever you, the customer, requests equipment to be added to the DrawTech equipment library and we fulfill that request. There are a few steps that you will need to take in order to download and use the equipment you requested. You will usually perform these steps after you receive an email from DrawTech Support that your equipment models have been completed.
Please be aware that this process will only work if you have a currently active DrawTech Support subscription and your hardware lock is up-to-date. If one of these conditions are not met then this process will not work.
Step 1 -
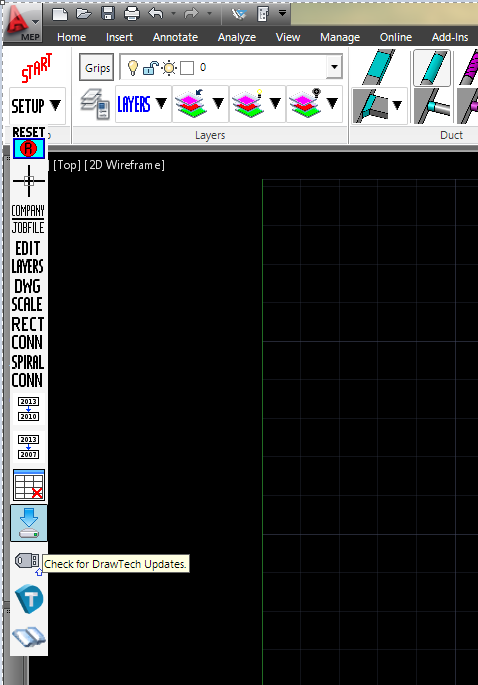
In order to use your equipment models, you will need to download them. You can do this by running the “Check for Updates” routine found under the “SETUP” flyout on your DrawTech ribbon, as shown in the screenshot below. This routine will also run every time you start AutoCAD with DrawTech running.
Step 2 -
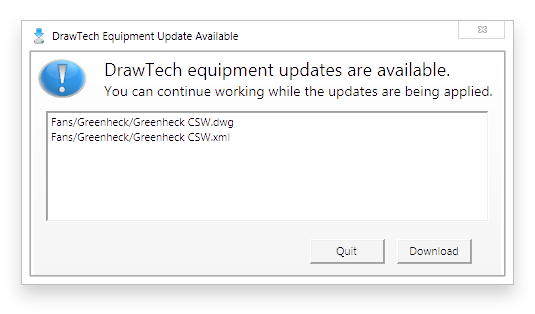
It is at this point you will be prompted with the window shown in the screenshot to download your model files. Simply click “Download” and the software will download the files and put them where they need to go automatically.
Step 3 -
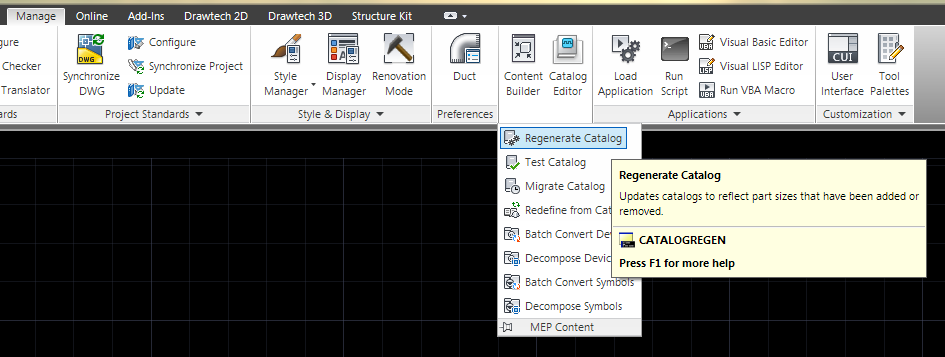
Once you’ve downloaded your model files, you will need to regenerate your MvPart catalog so that DrawTech and AutoCAD can actually use these models. You can regenerate your catalog by running the AutoCAD command CatalogRegen or navigating to the “Manage” tab on your ribbon and clicking “Regenerate Catalog” under the “MEP Content” dropdown shown in the screenshot. At this point, you will be prompted to select which catalog you want to regen, please follow the AutoCAD prompt in your commands window to regenerate your MvPart Catalog.
At this point, we also recommend hitting the “START” button on your ribbon, as this will refresh the DrawTech ribbon to correctly see everything in the catalog.
Now your equipment is ready to use.
For users who are inserting an updated model of a currently existing model in your drawing.
Please note, that if you are inserting updated equipment models that were placed in your drawing before. Then you’ll need to follow some additional steps to make your models show up correctly. This is because once you insert a model into your drawing with a specific name, for example a Nailor 3200-04-LH, AutoCAD will retain a copy of that model within the drawing and reuse it before it tries to use the actual model files that we’ve updated. You can follow these steps to ensure AutoCAD uses the updated model.
Addtional Step 1 -
Delete ALL instances of the model you’re trying to replace from your drawing. This is mandatory. You will also need to regenerate your MvPart catalog. Please follow Step 3 from above to do this.
Additional Step 2 -
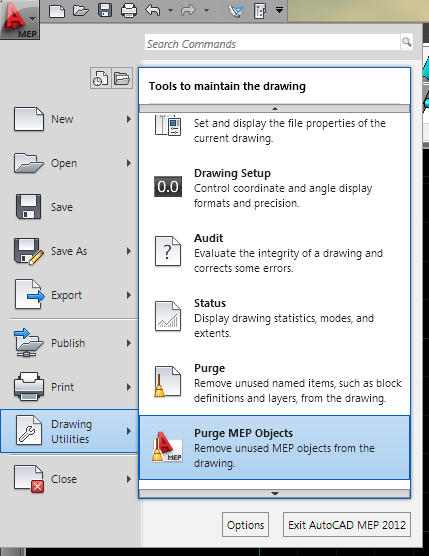
Open the AutoCAD menu by clicking the AutoCAD button on the top left of your AutoCAD window. Navigate to “Drawing Utilities” and then click “Purge MEP Objects”. This will clear all instances of your model retained within the drawing and allow you to use the updated model. You can use the following screenshot as a reference.
At this point any instance of the model you insert will come directly from the model files that have been updated. If you have any questions, please email us at support@drawtech.com.
